Warehouse Layout Optimization: Principles for Maximum Efficiency
Have you ever walked through a warehouse and felt like you were looking at a giant, expensive puzzle that just does not quite fit together? Maybe your pickers are constantly bumping into each other in the aisles, or perhaps you have noticed that your most popular items are tucked away in the hardest-to-reach corners. If that sounds familiar, you are certainly not alone. Many facility managers feel the frustration of a space that seems to work against them rather than for them. This is where warehouse layout optimization becomes more than just a buzzword. It is the secret to turning a chaotic room full of boxes into a high-performance engine for your business.
We get it. The idea of redesigning your entire floor plan can feel overwhelming. You have existing racks, tight deadlines, and a crew that needs to keep moving. But here is the thing. A poorly designed layout is costing you money every single day in the form of wasted steps, damaged goods, and slow fulfillment times. We are going to cut through the noise and give you a clear, actionable guide to fixing these issues. Whether you are starting from scratch with a new building or trying to make sense of a cramped existing space, we have gathered the insights you need to make every square inch count.
In this guide, we are going to explore everything from basic design principles to advanced space planning strategies. We will look at how the pros use vertical space, how to choose the right flow pattern for your specific inventory, and how technology is changing the way we think about storage. Our goal is to move beyond theory and give you practical advice that you can actually use. Let us get into the details of how you can transform your warehouse into an efficiency powerhouse.

The Foundations of Warehouse Design Principles
Before we start moving racks or buying new equipment, we need to talk about why we are doing this in the first place. The primary goal of any warehouse layout optimization project is to reduce the “touches” and the travel time. Every time a person or a forklift moves, it costs you labor. If an item is touched five times before it leaves the building when it only needs to be touched twice, you are literally throwing profit away. This is why we focus so heavily on flow and accessibility.
One of the first things we look at is the concept of warehouse design principles. These are not just suggestions. They are the bedrock of a functional facility. Think about the “golden zone.” This is the area between a person’s shoulders and waist where they can reach items most easily. An optimized layout places your most active items in this zone. When you multiply those saved seconds by thousands of picks a day, the impact is massive. It is about working smarter, not harder, and creating a space that naturally guides your team toward the most efficient path.
What we found is that the best layouts always prioritize three main things: flow, accessibility, and space utilization. Flow refers to the logical movement of goods from receiving to shipping. Accessibility ensures that you can get to the right SKU without moving three other pallets out of the way. Space utilization is about making sure you are using every bit of the volume you pay for, including the air above your head. If you keep these three pillars in mind, you are already ahead of most of your competitors.
The 80-85% Capacity Rule
Here is something most guides do not mention. A warehouse is actually considered “full” when it reaches about 85% of its total storage capacity. You might think that 100% utilization is the goal, but let us be real for a moment. If every single bin and rack is stuffed, you have zero room to move. When a new shipment arrives, where does it go? Your team ends up leaving pallets in the aisles, which creates safety hazards and slows down picking. This phenomenon is often called “honeycombing,” where small pockets of empty space are scattered throughout the warehouse but cannot be used effectively because the facility is too congested.
Targeting 80 to 85% capacity gives you the “breathing room” needed for efficient maneuvering and unexpected inventory spikes. It allows for better warehouse space planning because you always have a place to put incoming goods without disrupting the entire flow. If you find yourself consistently creeping above 90%, it is a clear sign that you either need a better layout or more space. According to industry research from organizations like the Material Handling Institute (MHI), maintaining this buffer is widely recommended for long-term operational health.
Mastering the ABCs of Inventory Placement
Now, let us talk about how you actually decide where items should live. This is where ABC analysis comes into play. It is a simple but incredibly powerful way to categorize your inventory based on how quickly it moves. Many warehouses follow the Pareto Principle, which suggests that a large share of your activity often comes from a relatively small share of your items. Those are your “A” items. Your “B” items are moderate movers, and your “C” items are the slow-moving “tail” of your catalog.
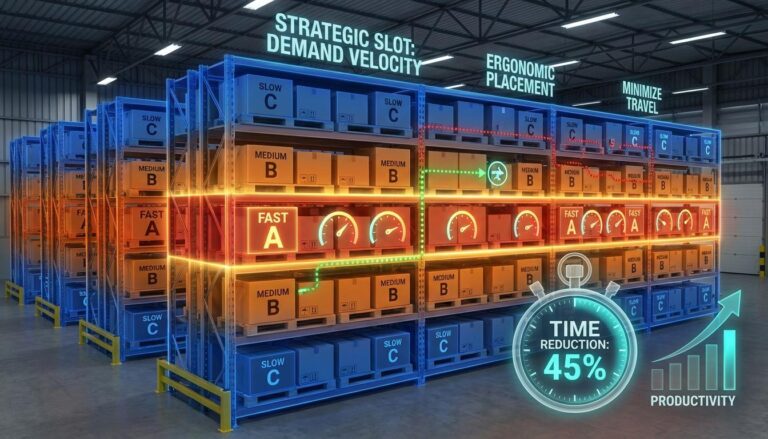
In a smart storage layout design, your A-items are placed in prime locations. This means they should be near the shipping docks and in the most ergonomic picking levels. You want the shortest possible travel distance for the items that fly off the shelves. B-items go a bit further back or on higher shelves, and C-items are tucked into the deep corners or the very top of your racking. This strategy drastically reduces the total distance your team walks every day. For a deeper look at the mechanics of this process, check out our guide on warehouse slotting guide.
Dynamic vs. Fixed Slotting
You might be wondering if you should keep items in the same place forever or move them around. The short answer is that it depends on your business. Fixed slotting means every SKU has a permanent home. This is great for stability and helps pickers memorize the layout. However, if you are in e-commerce or have seasonal spikes, dynamic slotting might be better. This is where you assign bins based on real-time demand. If a certain product suddenly becomes a bestseller, you move it to a high-velocity zone immediately. This flexibility is key to staying competitive in a fast-changing market.
The “So What” of ABC Analysis
In practical terms, this means you are treating your floor space like expensive real estate. You would not use a penthouse suite to store old files, right? So, why would you put slow-moving dust-collectors in your most accessible racks? By aligning your warehouse floor plan with the velocity of your goods, you can see throughput gains of 5% to 15% almost immediately. That is more orders out the door with the same amount of labor. It is one of the most cost-effective ways to optimize your operations without buying a single piece of new technology.

Choosing Your Flow: U-Shaped vs. L-Shaped vs. Grid
How do goods move through your building? This is the core of warehouse flow optimization. There are three classic shapes that most warehouses follow, and choosing the right one can make or break your productivity. Let us break this down so you can see which one fits your specific needs.

The U-shaped layout is probably the most common. In this setup, receiving and shipping are located right next to each other on the same side of the building. The goods move in a “U” shape through the facility. The big advantage here is shared resources. You can use the same dock doors for different tasks at different times of the day, and your shipping and receiving teams can share equipment like forklifts. It is a very compact, efficient design that works well for many businesses.
Then we have the L-shaped layout. This separates the receiving area from the shipping area by putting them on adjacent walls. This is great for separating the noisy, chaotic receiving process from the more precision-oriented packing and shipping tasks. It helps reduce congestion because the inbound and outbound traffic never cross paths. This is often a go-to choice for facilities that handle a lot of value-added services, like custom kitting or specialized labeling, because it provides more dedicated space for those middle steps.
Finally, there is the grid or I-shaped layout. This is common in massive distribution centers where goods enter on one side and leave on the opposite side. It is essentially a straight line. This “cross-docking” style is incredibly fast because there is almost no backtrack. However, it requires a lot of space and usually means you need separate equipment and staff for both sides of the building. It is the ultimate high-speed setup if you have the volume to justify it.
Which One Is Right for You?
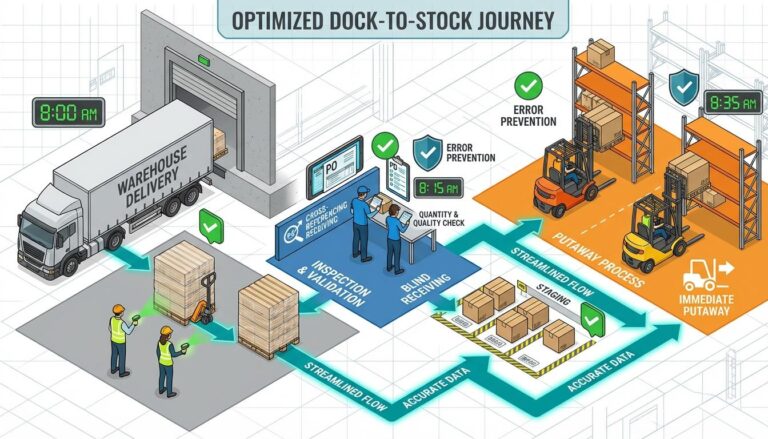
So, what should you do with this information? Look at your current building shape and your volume. If you have a square building and want to save on labor, the U-shape is a winner. If you have a long, narrow building, the I-shape or grid is often forced upon you by the architecture. The key is to ensure that your warehouse configuration matches your workflow. For more information on how to handle the start of this flow, see our resource on the warehouse receiving process.
Maximizing Vertical Space and Cubic Capacity
Most people think of their warehouse in terms of square feet. But we need to start thinking in terms of cubic feet. The floor is the most expensive part of your building, but the air above it is usually free. Warehouse space planning is essentially the art of getting as much inventory off the floor and into the air as possible. This is where we start talking about high-density racking and vertical utilization.
If you are still using standard selective pallet racking and you have 30-foot ceilings, you might be wasting half of your building. By switching to double-deep racking, drive-in racking, or push-back systems, you can pack significantly more inventory into the same footprint. We have seen facilities gain 20% to 40% more usable space just by rethinking their vertical strategy. It is like adding a whole new wing to your warehouse without the construction costs.
The Power of Mezzanines
Here is something most guides do not mention: the mezzanine. If you have a lot of manual picking of small items, building a mezzanine floor can effectively double your picking area. Instead of having a picker walk a mile of floor space, they can work on two levels in half the distance. It is a significant investment, but when you compare it to the cost of moving to a larger facility, the ROI is usually very clear. You are essentially manufacturing new floor space out of thin air.
Matching Beam Heights to SKU Dimensions
This is a small detail that makes a huge difference. Are your rack beams all set at the same height? If so, you are likely storing a lot of air. We recommend measuring your most common pallet heights and adjusting your beam levels to match. If you have 48-inch pallets but your beams are set at 60 inches, you are losing a foot of vertical space on every single level. Over hundreds of bays, that is enough space to fit an entirely new row of racks. It is a simple adjustment that costs nothing but a bit of time on a weekend.

Designing Aisles and Work Zones for Efficiency
Aisles are the highways of your warehouse. If they are too narrow, your equipment cannot turn. If they are too wide, you are wasting valuable storage space. This is a delicate balance in warehouse layout optimization. The width of your aisles should be dictated entirely by the equipment you use. A standard counterbalance forklift often needs about 12 to 13 feet to turn effectively. A reach truck only needs about 8 to 10 feet. Very Narrow Aisle (VNA) trucks can operate in as little as 5 or 6 feet.
What this means for you specifically is that you should not choose your racking first and your equipment second. They must be chosen together. If you are struggling with space, upgrading to reach trucks might allow you to shrink your aisles and add two or three more rows of racking. That is a massive gain in storage density. According to OSHA safety guidelines, you also need to ensure that your aisles are clearly marked and free of obstructions to prevent accidents and maintain a smooth flow.
Implementing One-Way Aisles
Have you ever been stuck in a traffic jam in a warehouse? It is frustrating and dangerous. One way to solve this is by implementing one-way traffic in your picking aisles. It sounds simple, but it virtually eliminates the “forklift standoff” where two drivers meet in the middle and someone has to back out. One-way aisles allow you to slightly narrow the width while actually increasing safety and speed. It creates a predictable rhythm that pickers can rely on.
Zoning for Specialized Tasks
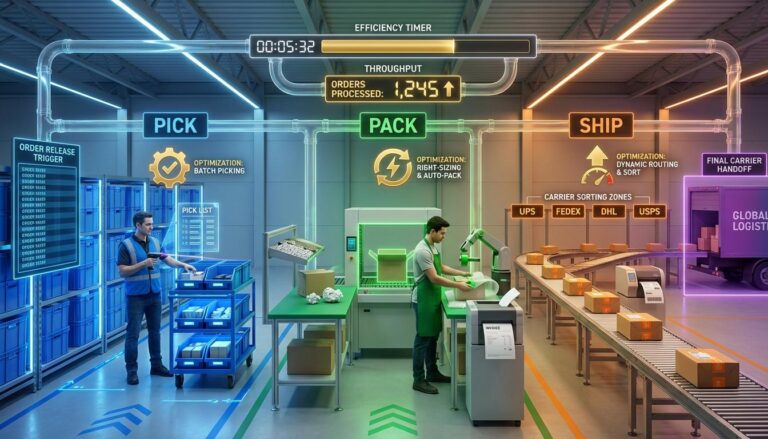
Not all areas of your warehouse are created equal. You need specific zones for receiving, reserve storage, forward picking, and shipping. But you might also need zones for Value-Added Services (VAS). This could include a station for gift wrapping, kitting, or specialized labeling. These zones should be placed logically between the picking area and the shipping docks. If your team has to walk “upstream” to reach a VAS station, your flow is broken. You want a continuous forward motion from the moment an order is picked until it hits the truck. Learn more about this final stage in our guide to the pick-pack-ship process.
Lean Principles: 5S and the War on Waste
You can have the most expensive racking in the world, but if your warehouse is a mess, it will never be efficient. This is where Lean principles come in. Specifically, the 5S methodology: Sort, Set in order, Shine, Standardize, and Sustain. This is not just about being neat. It is about removing the “friction” from your daily operations.
Let us be real for a moment. How much time does your team spend looking for a roll of packing tape or a specific pallet jack? If the answer is “more than zero,” you have a waste problem. In a Lean warehouse, every tool has a shadow-boarded home. Every aisle is labeled with high-visibility signage. The floor is kept clean (the “Shine” part) not just for looks, but because a clean floor reveals forklift leaks and prevents slips. It is about creating a visual workplace where anyone can walk in and understand exactly how things are supposed to work.
Reducing Non-Value Steps
One of the core tenets of Lean is the elimination of “Muda,” or waste. In a warehouse, waste is any movement that does not add value to the customer. Walking is waste. Searching is waste. Re-labeling because of an error is waste. When you are looking at your warehouse floor plan, ask yourself: “How can I eliminate these steps?” Sometimes the answer is as simple as moving the printer closer to the packing station. These small, “marginal gains” add up to a significant competitive advantage over time.
We were surprised to find that many facilities ignore the “Sustain” part of 5S. They do a big cleanup once a year and then watch as the chaos slowly creeps back in. True optimization requires a culture of constant improvement. It means doing a 5-minute sweep at the end of every shift and holding everyone accountable for their zone. It is the boring stuff that actually makes the big stuff possible.
Technology Integration in Warehouse Layouts
We are living in an era where technology is no longer optional for warehouse efficiency. A Warehouse Management System (WMS) is the “brain” that tells your layout how to function. Without a WMS, your optimized layout is just a static map. With one, it becomes a dynamic, living system. A good WMS can calculate the most efficient pick path, ensuring that your team is never walking more than they have to. It can also manage “cartonization,” telling the packer exactly what size box to use before they even touch the items.
Beyond software, we are seeing a massive rise in Autonomous Mobile Robots (AMRs) and Automated Storage and Retrieval Systems (AS/RS). These technologies allow for even higher density layouts. For example, an AS/RS can operate in total darkness and in aisles only wide enough for the machine itself. While this level of automation is a big jump for many small to mid-sized businesses, the costs are coming down in relative terms as the technology matures. Research from the Georgia Tech Supply Chain & Logistics Institute suggests that even partial automation can lead to substantial increases in throughput.
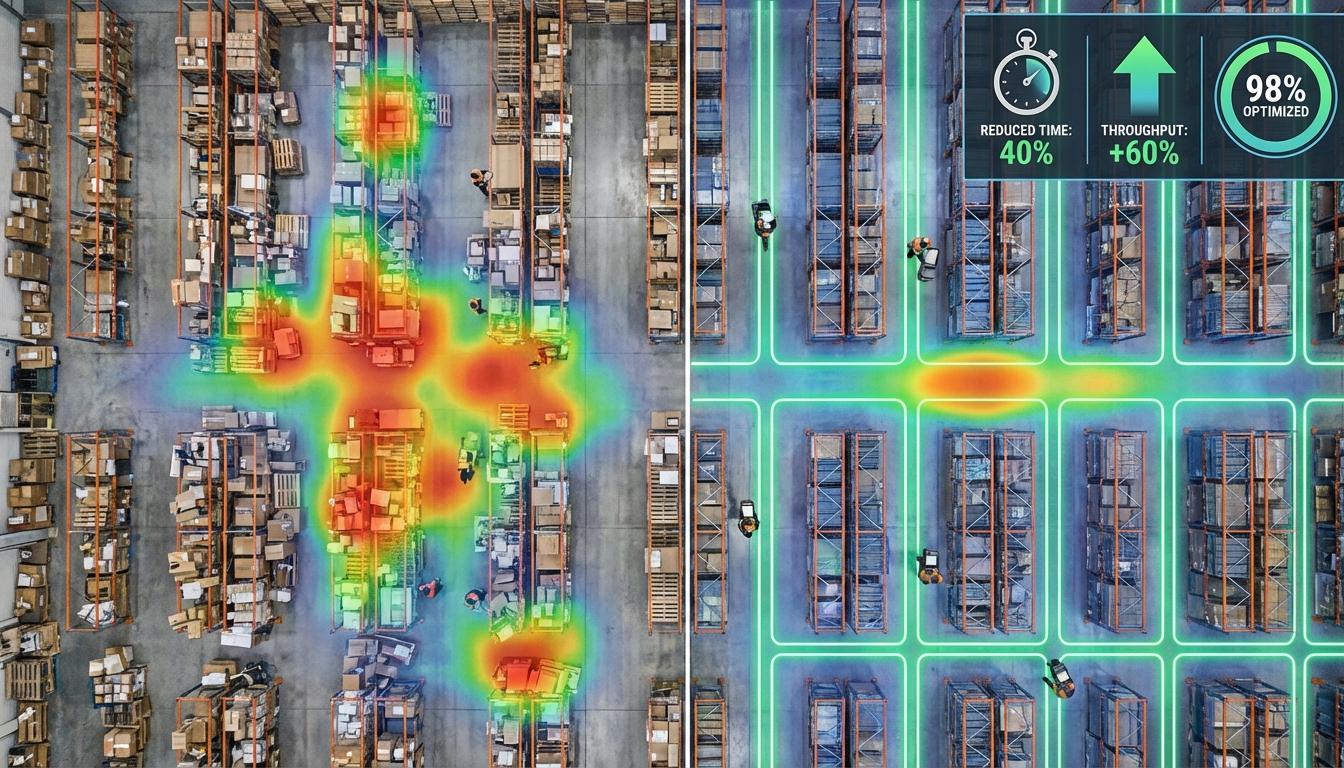
The Role of Real-Time Data
This is where it gets interesting. Modern systems can give you “heat maps” of your warehouse. You can literally see a visual representation of where the most activity is happening. If you see a big red “hot spot” in a narrow aisle, you know you have a congestion problem that needs to be solved. This data-driven approach takes the guesswork out of warehouse layout optimization. Instead of “feeling” like an area is slow, you have the hard numbers to prove it and the insights to fix it.

Measuring Success: KPIs for Layout Optimization
So, you have redesigned your layout, moved your racks, and trained your team. How do you know if it actually worked? You cannot manage what you do not measure. There are a few key performance indicators (KPIs) that will tell you the truth about your new warehouse configuration.
- Order Lead Time: How long does it take from the moment an order is placed until it is ready to ship? A better layout should drop this number significantly.
- Picking Accuracy: Better lighting, clearer signage, and logical slotting should lead to fewer mistakes.
- Travel Time per Pick: If you have a WMS, you can track how much time pickers spend moving versus actually picking. This is the ultimate test of your ABC analysis.
- Space Utilization: Are you storing more inventory in the same footprint? Calculate your cubic capacity before and after the change.
- Labor Cost per Order: If your team is more efficient, your cost to fulfill each order should go down.
Here is the practical takeaway. Do not try to track everything at once. Pick two or three metrics that matter most to your business and watch them closely. If you see your travel time per pick going down, you know your storage layout design is working. If your lead time is stuck, you might have a bottleneck in your packing or shipping area that needs more attention.
Frequently Asked Questions
What is the most common mistake in warehouse layout design?
The most frequent error we see is designing for today instead of tomorrow. Many businesses build a layout that fits their current inventory perfectly but has zero room for growth. Within a year, they are back to having pallets in the aisles. Always build in about 15-20% extra capacity for growth and seasonal fluctuations. It is much cheaper to have a little extra space now than to redesign everything again in twelve months.
How often should I re-evaluate my warehouse layout?
This comes up a lot, and the answer is at least once a year, or whenever you see a significant change in your product mix. If you add a new product line or if your sales volume jumps by 20% or more, your old layout might not be the best fit anymore. Treat your layout like a living document. It should evolve as your business evolves.
Is a U-shaped layout always the best choice?
Great question. While it is the most popular, it is not always the best. If you have an extremely high volume of goods moving through very quickly, a “cross-dock” or I-shaped layout might be better to prevent the shipping and receiving teams from tripping over each other. The “best” layout is the one that minimizes your specific travel distances and bottlenecks.
How can I optimize my layout on a tight budget?
You might be surprised to learn that you do not need to buy new racks to see a huge improvement. The most effective low-cost move is re-slotting. Just by moving your top 20% of items (your A-items) closer to the shipping area, you can significantly cut travel time. Combined with clear signage and a good 5S cleanup, you can see massive gains for almost zero capital investment.
What is the “Golden Zone” in picking?
The Golden Zone is the vertical space between a picker’s waist and shoulders. Items placed here can be picked much faster and with less physical strain than items on the floor or high above the head. Placing your high-velocity SKUs in this zone is one of the simplest ways to boost picking speed and reduce workplace injuries.
Summary of Key Takeaways
We have covered a lot of ground today. Optimizing your warehouse layout is a journey, not a one-time task. If you are feeling a bit overwhelmed, remember these core takeaways to help you get started:
- Focus on Flow: Choose a layout (U-shaped, L-shaped, or Grid) that minimizes backtracking and keeps goods moving forward.
- Use Your ABCs: Put your fastest-moving items in the most accessible spots. This is the single fastest way to save labor costs.
- Think Vertically: Stop looking at your floor and start looking at your ceiling. Vertical space is your best friend when it comes to density.
- The 85% Rule: Never aim for 100% capacity. You need room to move, or your efficiency will plummet.
- Lean into Technology: Whether it is a basic WMS or advanced robotics, use data to guide your decisions.
Now you have everything you need to start transforming your facility. The next step? Go out onto your warehouse floor during a busy shift and just watch. See where the traffic jams are. Look for people wandering around looking for things. Those are the clues that will lead you to your first big win. You have got this. A more efficient, more profitable warehouse is well within your reach.